
When my 9 year old son asked if we could build a telescope for his birthday, I could not have been happier. I was thrilled at the idea he wanted a telescope of his very own, and building it together would be some great one on one time.
My experience with the Kid Peek telescope taught me that with kids and telescopes, the most important thing to remember is that they want to use it HANDS ON. A scope that was too delicate, or difficult to use is no fun, and won't see much action. The Kid Peek scope is a great hands on scope, and my goal for his scope was that it be the same.
As we already had a kid friendly refractor, it seemed natural that this scope be a reflector. A couple of years earlier I had picked up a nice 4.5" optical tube from a defunct Meade electronic whiz-bang mount with the idea I would do something fun with it someday. It seemed that the day had arrived. It would be the foundation for Kid Peek II.
When considering the mount options, I considered a pipe mount, but in the end decided for the sake of ease of use and ease of construction it is very hard to beat the simplicity of a Dobsonian mount, and so that was our mission.
Since we already have a tube that we are trying to mount, naturally, the planning starts there. The style of dob mount I had in mind uses a box around the tube to which the altitude bearings are attached. The first order of business was to determine what size that box had to be. By measuring the diameter of the tube, and sizing the inside of box to fit we have a start.
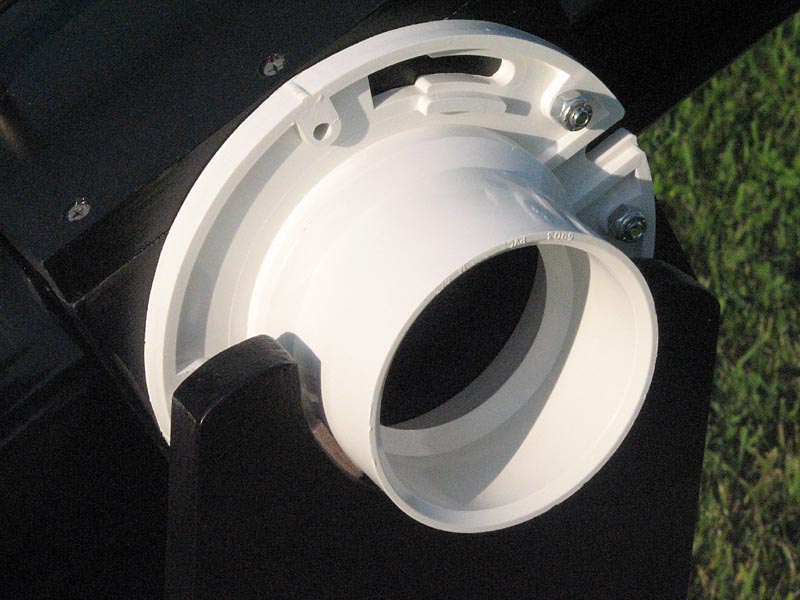
Next, we need to consider what we intend to use for the altitude bearings. To keep construction simple to accommodate my 9 year old assistant, I tried when I could, to buy components that were ready to use right off of the shelf. In this case I found my bearings in the plumbing department, PVC Toilet Flanges. They are inexpensive, readily available and have a kind of cool Star Wars-zy look to them. With them in hand, I could now determine the total width of the Tube Box with the bearings attached.
Once I had that measurement, I could then determine just how far apart the sides of the rocker have to be to accommodate the box with the bearings attached.
Now that we have the width decided, the next spec to determine is how high I need the rocker to be. Of course, the only real requirement is that it be tall enough to allow the scope to swing vertical. As the length of this tube is relatively short, that would not require much of a rocker. But as anybody who has used a small scope will tell you, getting all the way down there to get to the eyepiece can be a bit uncomfortable at times.
I knew that I wanted to make the scope a bit taller, and realized that since this was a custom scope for a very special astronomer, the best plan might be to fit it to him. I took some measurements and determined that in order to "fit" my special astronomer, the eyepiece should be a 46" at the zenith to allow him to observe flat footed. Factoring in that height, the balance point of the tube, the thickness of the base and the diameter of the bearings, I determined that I needed rocker sides 28" tall.

I find to help me visualize the project, making a simple drawing is always a worthwhile exercise, and so I took my measurements and some time and made a quick drawing (I told you it was simple....) The drawing is also very useful to help me determine just what materials I needed to gather.
As the size of this project was relatively small, and I could get solid wood boards of the required widths, I decided to use solid wood rather than plywood. Using these boards would make the cutting process easier than handling a plywood sheet. We took our plan and headed out to the store where we picked up a couple of poplar boards and a couple of pre-cut 15" pine disks for the ground board and rocker base. These disks were just the right size for the project, inexpensive, and saved us having to buy some plywood from which to cut circles of that size. A nice time and money saver. With our materials in hand we headed to the shop.

The cutting of the stock went very quickly, and, with the exception of the curved cut for the altitude bearings, were very simple and easy to do using a table saw. The curved cuts were easily done with an electric jig saw, The construction plan was also simple - glue and screws.
We started with the rocker - pre drilling all of the screw holes.

Glue applied, and using clamps to assist in holding the pieces firmly in place, my able assistant drove the screws home.

The rest of the assembly was pretty straight forward, more drilling, gluing and screwing until we had completed the fabrication. We were both pleased that it went very quickly and without trouble. By afternoon we had a scope mount ready for paint

I had been advised by my assistant that this scope would undoubtedly look the coolest if painted Black. I was not sure what method of paint to use, as whatever I chose, I wanted 9 year old hands to be heavily involved. Ultimately I decided that while it would not be as smooth as spray, we would paint it using brushes - it just seemed to be more manageable. The raw wood did need a coat of primer, and that we did spray on in a couple of coats.

We applied two coats of black paint without incident with the exception of two highly suspicious "accidental" collisions of his brush with my arm. My partner had ample time to practice the fine art of brush application as he did a good portion of the painting. I believe it would easily pass the inspection of any 9 year old judge you would want to bring around.
With things painted, it was on to the final fittings and assembly.
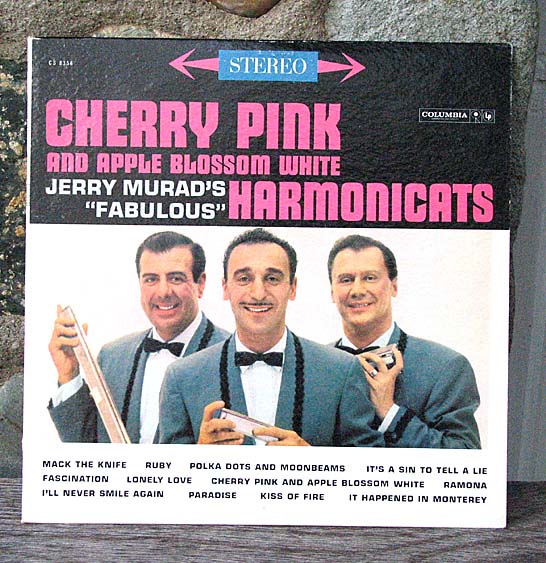
For the azimuth bearing I used some teflon pads that I had left over from a previous project, but you could easily substitute Easy Slider furniture slides. The teflon was to ride against an LP Record Album. The album was secured to the bottom of the rocker base using epoxy, and the teflon to the ground board using countersunk screws.
I would like to personally thank the Harmonicats for their contribution to this project. It seemed natural to make sure the side with "Polka Dots and Moonbeams" was facing the teflon pads....
For the altitude bearings, I had discovered with the first Kid Peek Scope that PVC on Easy Sliders was too slick. For this scope I replaced the Easy Sliders with felt pads - they worked great. Smooth, but with holding power, just right.
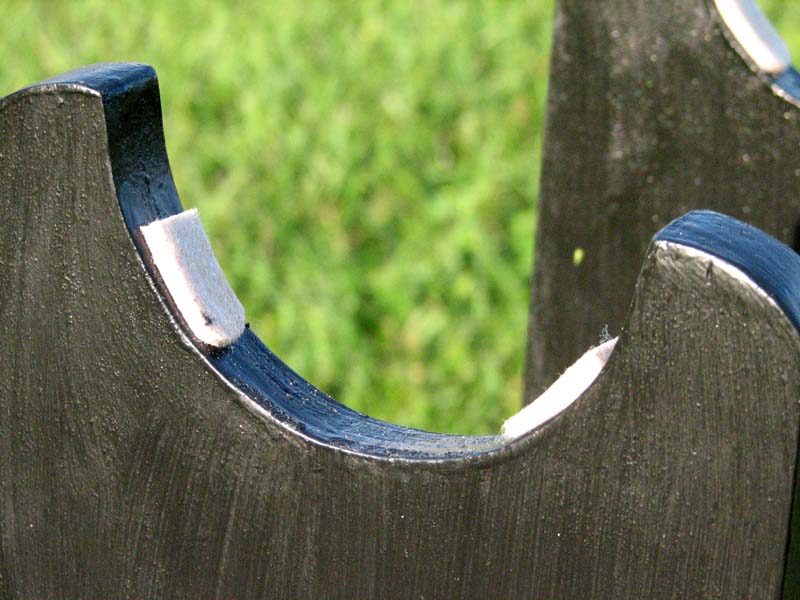
The tube box is designed to let the scope slide forward and back as needed to adjust the balance point. In order to make that possible without scratching the tube, I placed felt lining at the points where the tube makes contact with the walls of the box. You want this fit to be relatively tight, so the tube stays where you put it throughout the range of altitudes.

I added a couple of handles to the tube box and the rocker to make carrying the scope easier. These are just drawer pulls we picked up at the home center.

For a finder, I added a red dot finder on one of my Cheap And Simple Red Dot Finder Mounts. I have found these to simply be the best solution for a kid's scope. They are so easy to use that kids take to it immediately.
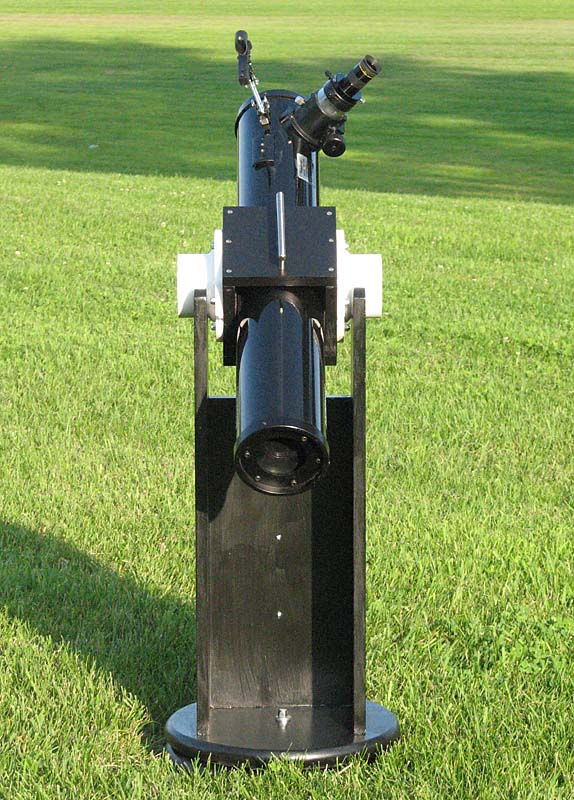
Here are some shots of the finished scope.
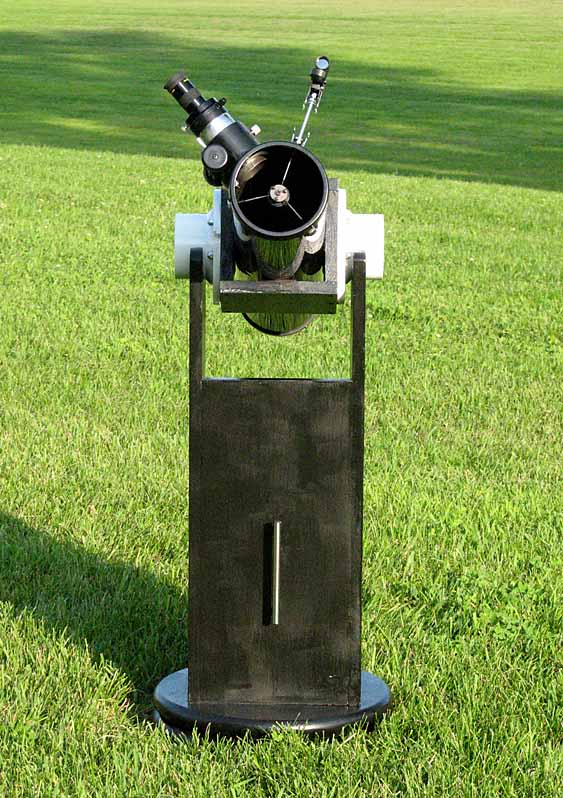
Front View

Down the Tube
From the rear

Another of the Focuser and Finder

Maybe in a Past Life.......Not So Much These Days....

At the zenith
In all the scope was a great project - made even more enjoyable by the time my son and I spent together working on it. The pride he feels when he shows it to people is evident, and a heck of a lot of fun for his Old Man to watch.
©2009 Rod Nabholz
 Back
to Home Built Astronomy Projects
Back
to Home Built Astronomy Projects