
The Goals
 After
many years of hauling around this monstrously heavy Coulter 13.1" Odyssey
One, my back had had enough. Constructed of 1.25" particle board and sonotube,
it was a real killer to transport.
After
many years of hauling around this monstrously heavy Coulter 13.1" Odyssey
One, my back had had enough. Constructed of 1.25" particle board and sonotube,
it was a real killer to transport.
All of that mass had another drawback, it was ridiculously slow to cool down, in fact many nights the tell tale tube currents were present throughout the entire observing session.
Another issue was that transporting that scope required so much room in the vehicle that it often had to remain behind on family trips to some great dark skies.
I had harbored the idea of a truss tube style rehab, but I must admit, some of the designs I had seen seemed to be a lot of fiddling around with tubes, connectors etc. I know myself well enough to know that facing anything that resembles a chore when it comes to scope set up would likely keep me inside.
I also had to be able to accomplish this transformation on a reasonable budget. As this was a convenience upgrade, it was hard for me to justify raiding the family treasury for great sums of money.
I needed something portable, quick, low hassle set up, and attainable with a modest budget.
The Plan
I scoured ATM pages on the net for quite some time until I came upon Ron Ravneberg's portable travel scope. I was immediately drawn to the simplicity of the two tube design. Using what I learned there I expanded the search to other two tube designs hoping to find one in a larger aperture that I could draw from. Ultimately I came across Peter at Kitgear's excellent adaptation: (http://www.kitgear.com/my_first_scope.htm) for a 12.5". I contacted Peter via email and asked a couple of questions that weren't immediately obvious from his photos on his site. He was quite generous with his time and encouragement to undertake the project.
I had a concept, but no specific plans. I felt that I needed to take some time and visualize the plan, make some simple drawings and generally just get an idea of the work this would involve. I spent a couple of weeks of evenings sketching and drawing until I felt I had a handle on it. It was time to dive in.
Just a comment on a couple of the design choices that might strike you as you look at the scope. You will see that the mirror box and rocker are taller than is “fashionable” in many scopes being made these days. With a two tube design you sacrifice a couple of things, prime among these is the opportunity to block stray light with a shroud. A second consideration is giving the two tubes as much support as possible. The taller mirror box improves things to some degree on both of these issues. The deeper box blocks more off axis light and allows me to support the tubes along a longer portion of their length, hopefully reducing flex.
I made the rocker taller to put the eyepiece closer to my eye level at the zenith. This is taller than it absolutely would have to have been, but there is another consideration this design brings to the equation. The vertical orientation of the focuser board makes viewing at lower altitudes less comfortable than with other designs where the focuser is at a different angle. A lower rocker putting the eyepiece at a lower level would further exacerbate the issue, so a little extra height makes things more comfortable.
The focuser board is also larger than would absolutely be necessary. That choice was made to allow the use of the board as a cover for the mirror box, making for a neat closed package for transport or storage. If you need to save weight to accommodate a finder or other accessory, you could certainly reduce the size of this component.
The Book
At the encouragement of some online acquaintances, I had purchased the book "The Dobsonian Telescope" by Kriege and Berry. This was one of the best pieces of advice I received. While my design differed in many ways from the Obsession Style they advocate in the book, there were many aspects that were the same or similar. I found the book a wonderful resource throughout the project, and a just plain interesting read. I strongly recommend it to anyone considering a project of this type.
The Mirror Cell
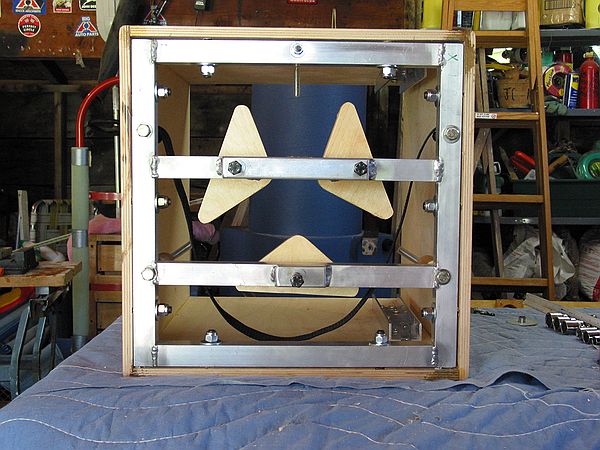
It was from the book that I drew the concept of the mirror cell I built for the scope. My cell differs in that the cell is a full square instead of rectangular. I made this change for a couple of reasons. First I felt the full square would better reinforce my relatively light mirror box. The second consideration was, because my rocker would be taller than some, I would have plenty of clearance for the mirror box, and would not need to trim the leading edge at the bottom of the mirror box, one of the key reasons for the rectangular shape of the cell in their design.
I decided on 1" square aluminum tube for the cell. I liked the idea of the weight savings and rust resistance vs steel. I drew out the plan on graph paper and, because I don't have the skills or equipment for aluminum welding, delivered the drawing and the stock to a local blacksmith's shop for him to cut and weld. As I described the function of the cell, the welder expressed concern with the relatively thin walls of the aluminum tube with regard to threading it for the collimation bolts. We agreed that it might be best to attach a piece of 3/8ths flat stock at the bolt locations to give is some additional material to thread. A day later the frame was finished.
For the triangles of the cell, I decided to use ½" Baltic Birch plywood. The book prefers metal for this part, but in the interest of limiting expenses, and because this is a relatively small scope with a thin mirror (just 1 1/8th" thick) compared to Kriege's usually larger scopes, I felt that I could get away with it. I fashioned the triangles and attached felt floor protectors to the points.
I had the blacksmith thread the collimation bolt holes with 3/8ths fine threading. The fine threading makes small adjustments much easier. I can simply turn the hex heads of the bolts by hand, very smooth.
Once the triangles were made, the balance of the cell assembly went as described in the book. Split bolts and nylon strapping for the sling, Wood dowels and eyebolts for the mirror keepers. One departure was the use of a plastic report cover instead of Kydex for the triangle keeper ring, just a matter of cost and availability.
I will admit that the cell was a daunting piece of this project. Maybe because I did not have the skills to do it all myself, or maybe because it was so foreign to me. Whatever the reason, I was pleased to have it done and behind me.
 Back
to Home Built Astronomy Projects
Back
to Home Built Astronomy Projects